
This section tracks the path taken by Michael Wittmann into the town of Villers-Bocage during the morning of 13th June 1944. I have used a number of different sources to put these together, and hopefully it provides a concise overview of the events that occurred. Naturally there will still be the ongoing debate over who was exactly where and when – and given that we will probably never know every small detail this is probably as close I am going to get to providing a visual narrative.
Note that the graphic representations of the vehicles on the mission maps are not to scale – the Tiger was big, but not that big!
The morning of 13th June: The Panzers start rolling
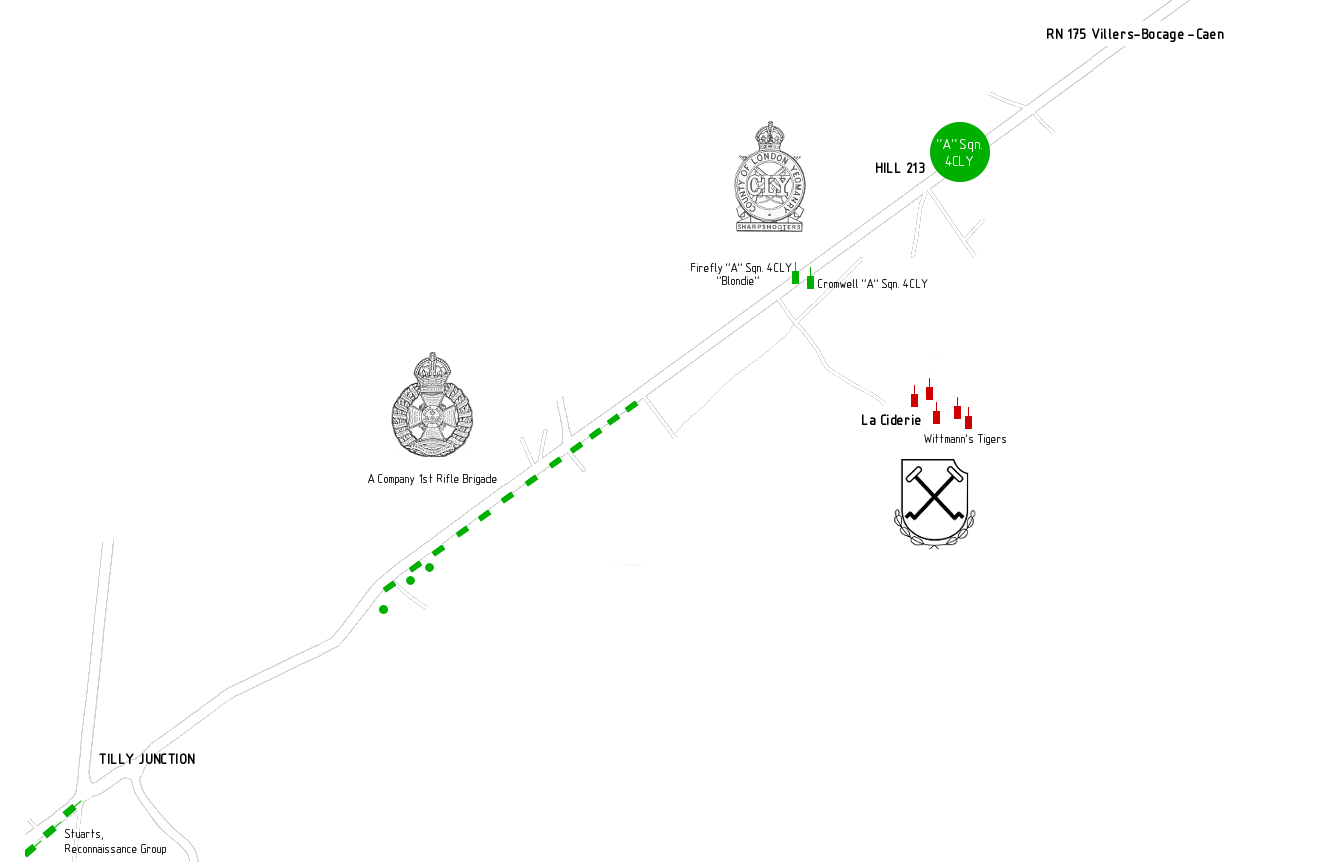
Having set out from the west in the morning, British forces moved into Villers-Bocage and onto the Route Nationale 175 at the point known as Hill 213 – arriving at their intended position by 08:00. Lining up were the 4th County of London Yeomanry (4CLY), whose “A” Squadron were positioned east of Villers-Bocage and on the RN 175 leading to Hill 213; accompanying them would be vehicles of the 1st Rifle Brigade and two Observation Post (OP) tanks of the 5th Royal Horse Artillery.
Unbeknownst to the British, five Tiger Is were waiting in the woods south of the RN 175 at a location called “La Ciderie”. Of these only three were fully serviceable, including Tiger 222 of the Leibstandarte’s 2. Kompanie – which after some shuffling of personnel was commandeered by SS-Hauptsturmführer Michael Wittmann.
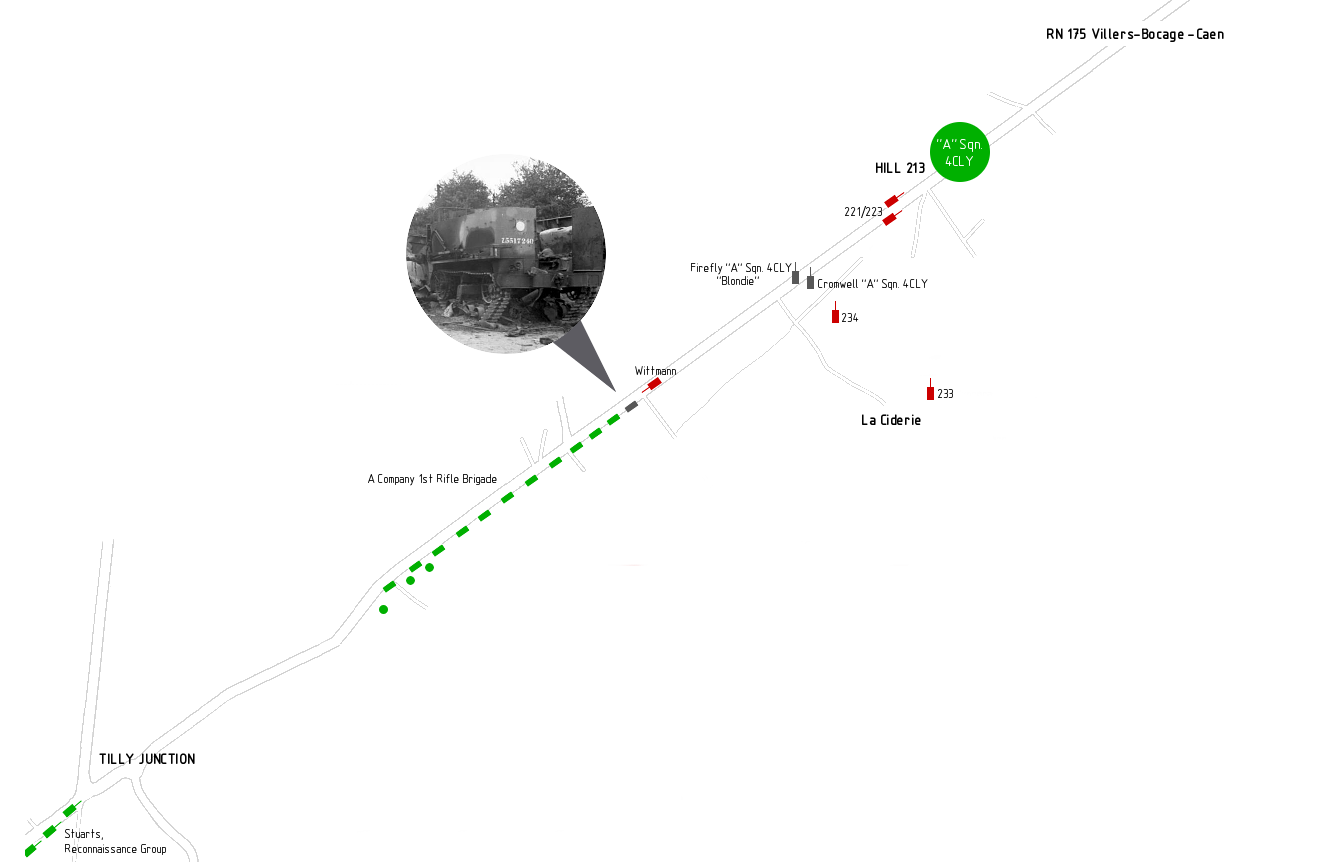
The first phase of the attack saw the three serviceable Tigers (221, 222 and 223) advance towards the road with a fourth, 234, assuming a secure rearguard position. Wittmann in 222 made a charge for the vehicles at the end of the leading column, while Tigers 221 and 223 commanded by SS-Untersturmführer Georg Hantusch and SS-Oberscharführer Jürgen Brandt made their way towards Hill 213.
The first opponents “brewed up” by Wittmann were the two 4CLY vehicles towards from the leading column, a Sherman Firefly nicknamed “Blondie” and a Mk. IV Cromwell.
|

|
The Charge down the RN 175
With the burning Firefly blocking the highway and the two other Tigers engaging the lead elements of 4CLY towards Hill 213, the path was clear for Wittmann to engage the entire 1st Rifle Brigade column on his own. Taken completely by surprise, the collection of a dozen half-tracks and carriers were helpless against the Tiger’s 88mm gun.
In all, a total of M5 eight half-tracks and four universal and Loyd carriers were left burning on the side of the road as the Tiger trundled past, along with two six-pounder field guns.
|

|
Tilly Junction and the approach to Villers-Bocage
Having left a trail of destruction on the the roadside behind him, Wittmann continued towards Villers-Bocage. At the junction with the road leading to Villy-Bocage and Tilly-sur-Seulles (the “Tilly Junction”) he encountered three M3A3 Stuart light tanks belonging to the 4CLY’s Reconnaissance Troop. The first Stuart commanded by Lieutenant Rex Ingram attempted to block the Tiger’s path, but all three were no match for the German vehicle and were quickly dispatched.
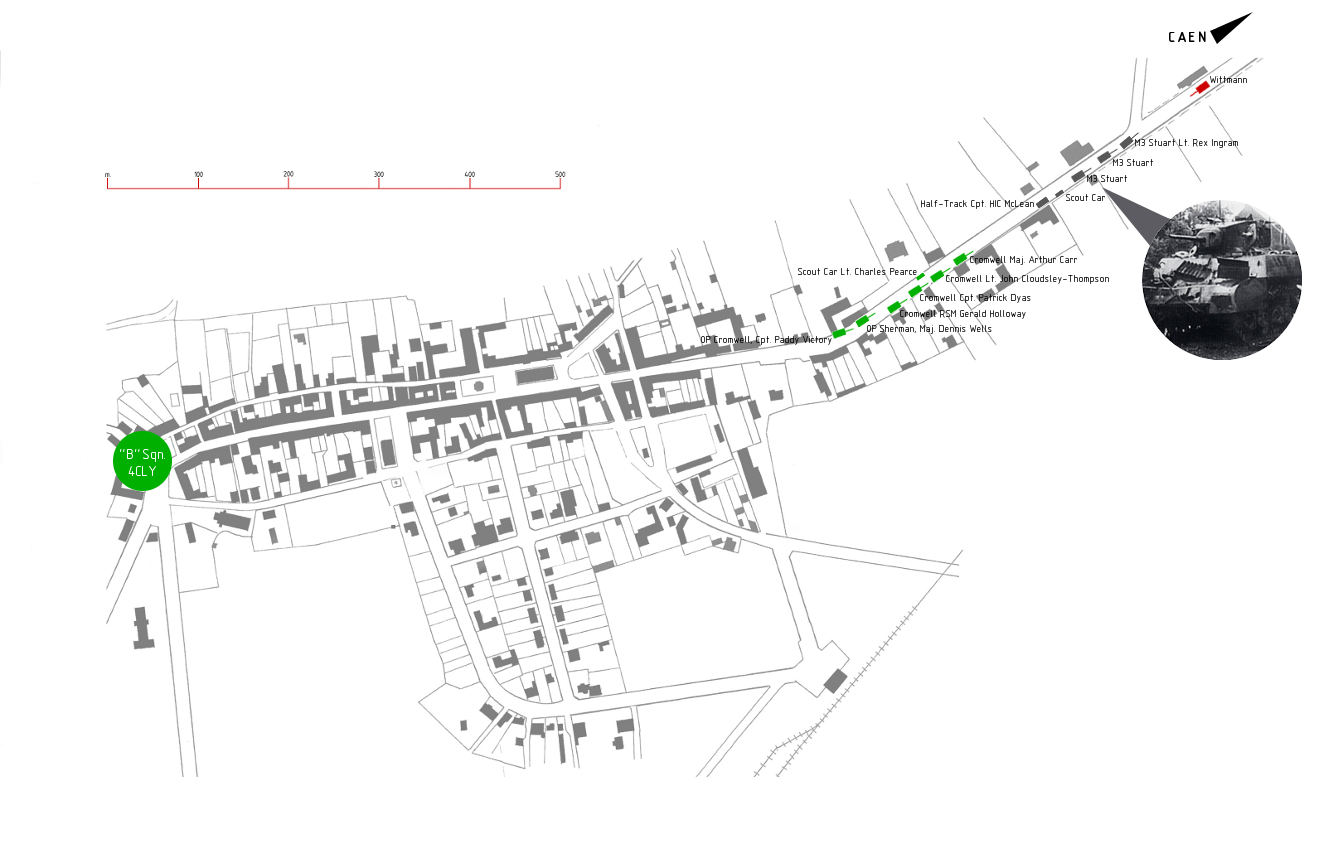
Onwards into the centre of town
Having brushed past the Stuarts at Tilly Junction, next in line were the Mk. 4 Cromwells of 4CLY’s Regimental Headquarters (RHQ). The slow-moving Cromwells attempted to give themselves a chance by reversing out of the Tiger’s path, but were unable to get themselves into a suitable position. Three of the four RHQ Cromwells were quickly reduced to smouldering wrecks as Wittmann continued on towards the town centre, with the exception of RHQ Adjutant Captain Pat Dyas, who somehow managed to manoeuvre his tank into an empty adjacent garden.
Dyas, lacking his gunner, could only watch the Tiger roll past him down Rue Georges Clémenceau to knock out two Observation Post tanks belonging to the 5th Royal Horse Artillery. Not equipped for a combat situation, the two OP vehicles had no opportunity to defend themselves. Meanwhile, Lieutenant Charles Pearce managed to escape from the melée in his Humber scout car – making his way to the west of Villers where 4CLY’s “B” Squadron had been positioned earlier that morning.

|
|
The mission comes to an end
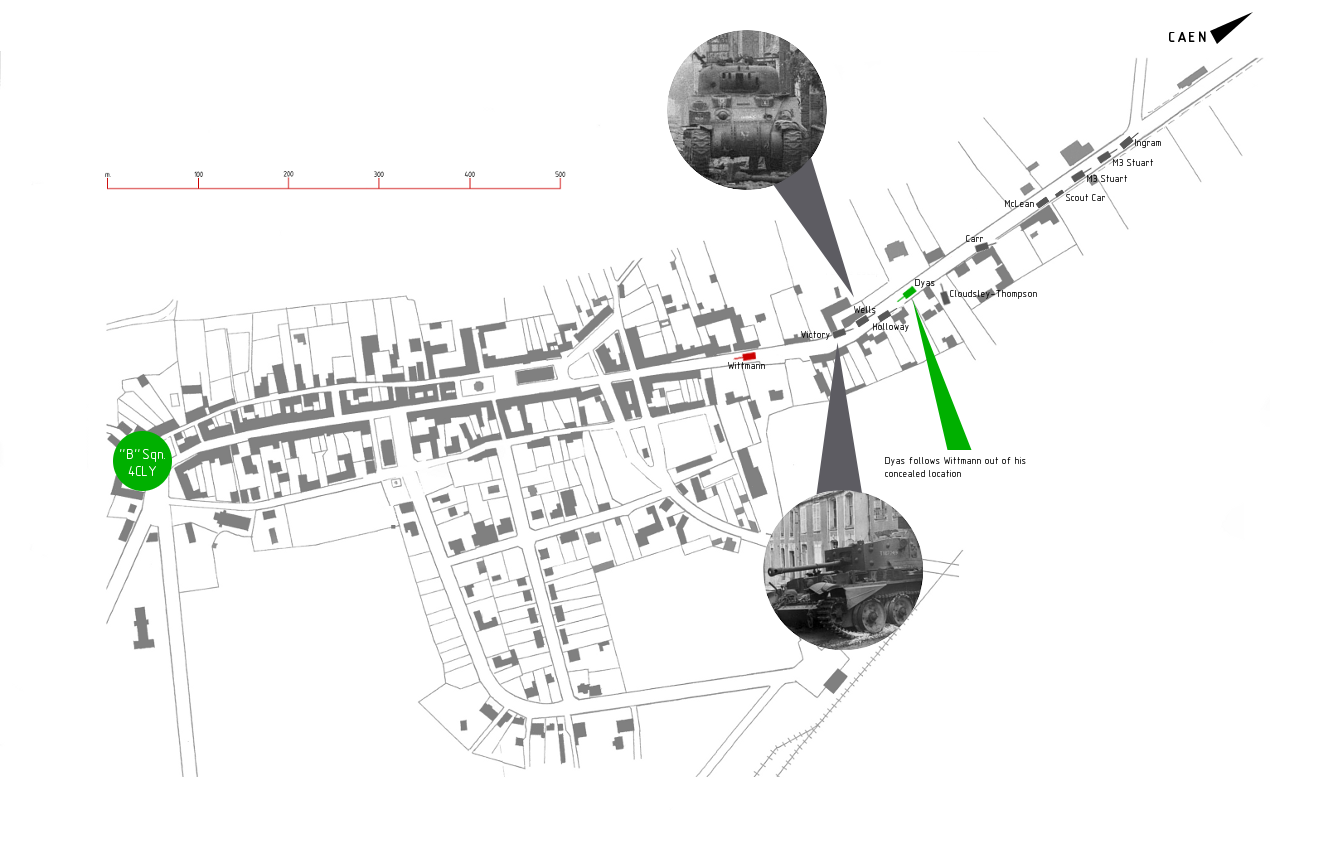
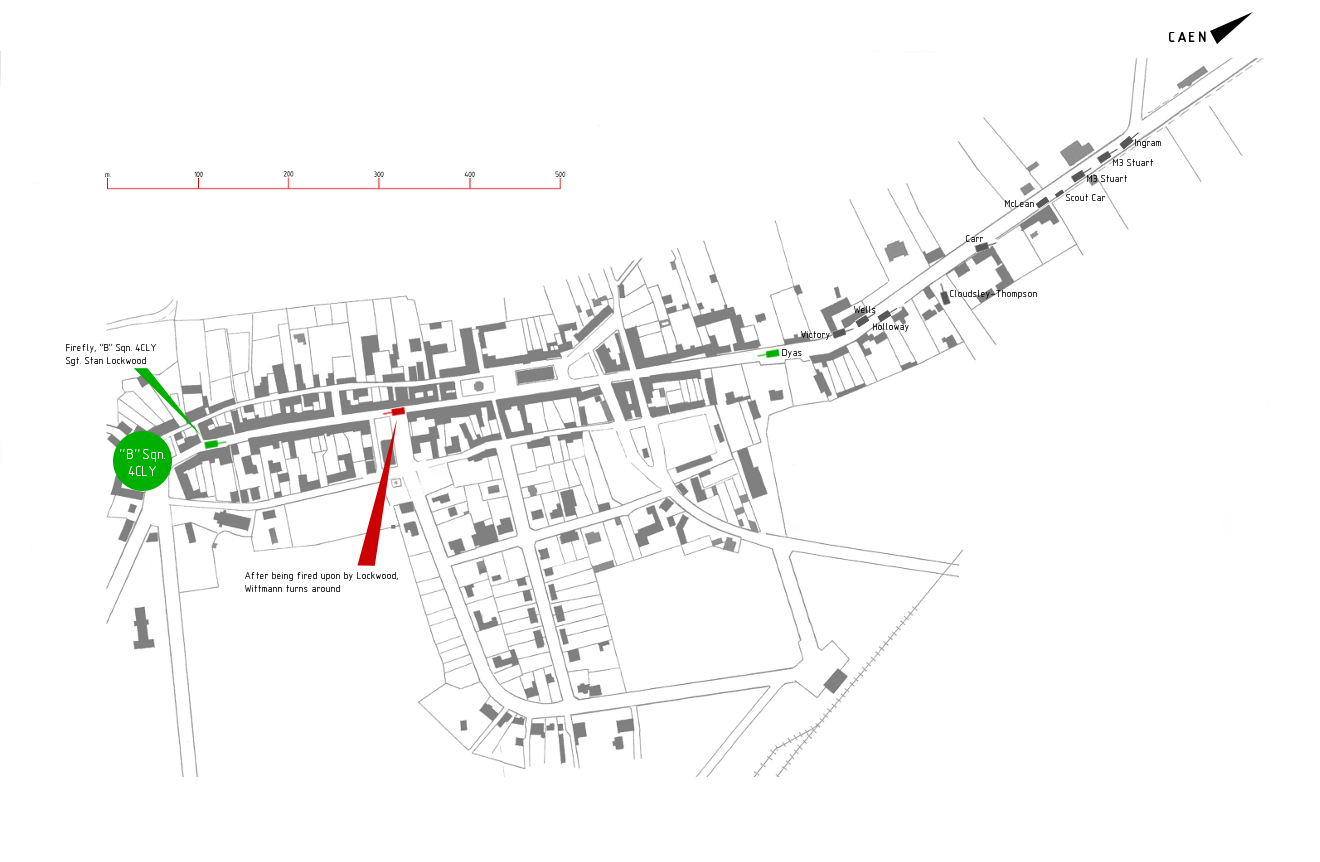
Continuing into the centre of town and on towards Rue Pasteur, Wittmann encountered his first seriously threatening opponent in the form of a Sherman Firefly commanded by “B” Squadron’s Sergeant Stan Lockwood. Alerted by Lt. Pearce, Lockwood had headed into the centre of town from the west. After being shot at in anger by a challenging opponent for the first time, Wittmann knew that the mission had come to an end. After a close shave with the Firefly that saw the British vehicle covered in rubble from a collapsing building, Wittmann had bought enough time to make good his escape.
With the smoke and dust behind him, Wittmann had failed to notice Captain Dyas slowly following him in his Cromwell, which had found its gunner and moved back out onto the street. Dyas’s gunner managed to fire two shells at the Tiger, only to see them bounce harmlessly off the German vehicle. The slow-moving Cromwell was now a sitting duck, and Dyas knew that he stood no chance as Wittmann’s Panzer lined up a return shot. Dyas survived after being blown out of his turret, but his Cromwell was Wittmann’s final victim of the morning.
The Tiger would then come to a halt – either from a six-pounder gun located in a side street or as a result of a strike from Lockwood’s Firefly – in front of the Huet-Godefroy clothing store. After securing his position, Wittmann and his crew were able to safely abandon their vehicle before escaping on foot with their sidearms.
|

|
Not long after Wittmann’s foray into Villers-Bocage, tanks from Rolf Möbius’s 1. Kompanie of the 101st Battalion entered the town accompanied by Panzer IVs of Panzer-Lehr. However, the British by now had managed to regroup – with 4CLY’s “B” Squadron playing a key role in a firm defensive action that saw four of 1. Kompanie’s Tigers left disabled in the town centre.
Wittmann’s Escape
Having vacated their stricken Tiger, Wittmann and his crew made their way by foot to the HQ of the Army’s Panzer-Lehr Division at Chateau d’Orbois, located a kilometre north of the village of Beltot and some seven kilometres north of Villers. The crew essentially followed the road that is today the D33, passing through or around the village of Gournay en Bray and the town of Feuguerolles sur Seulles before reaching Panzer-Lehr HQ in the early afternoon.
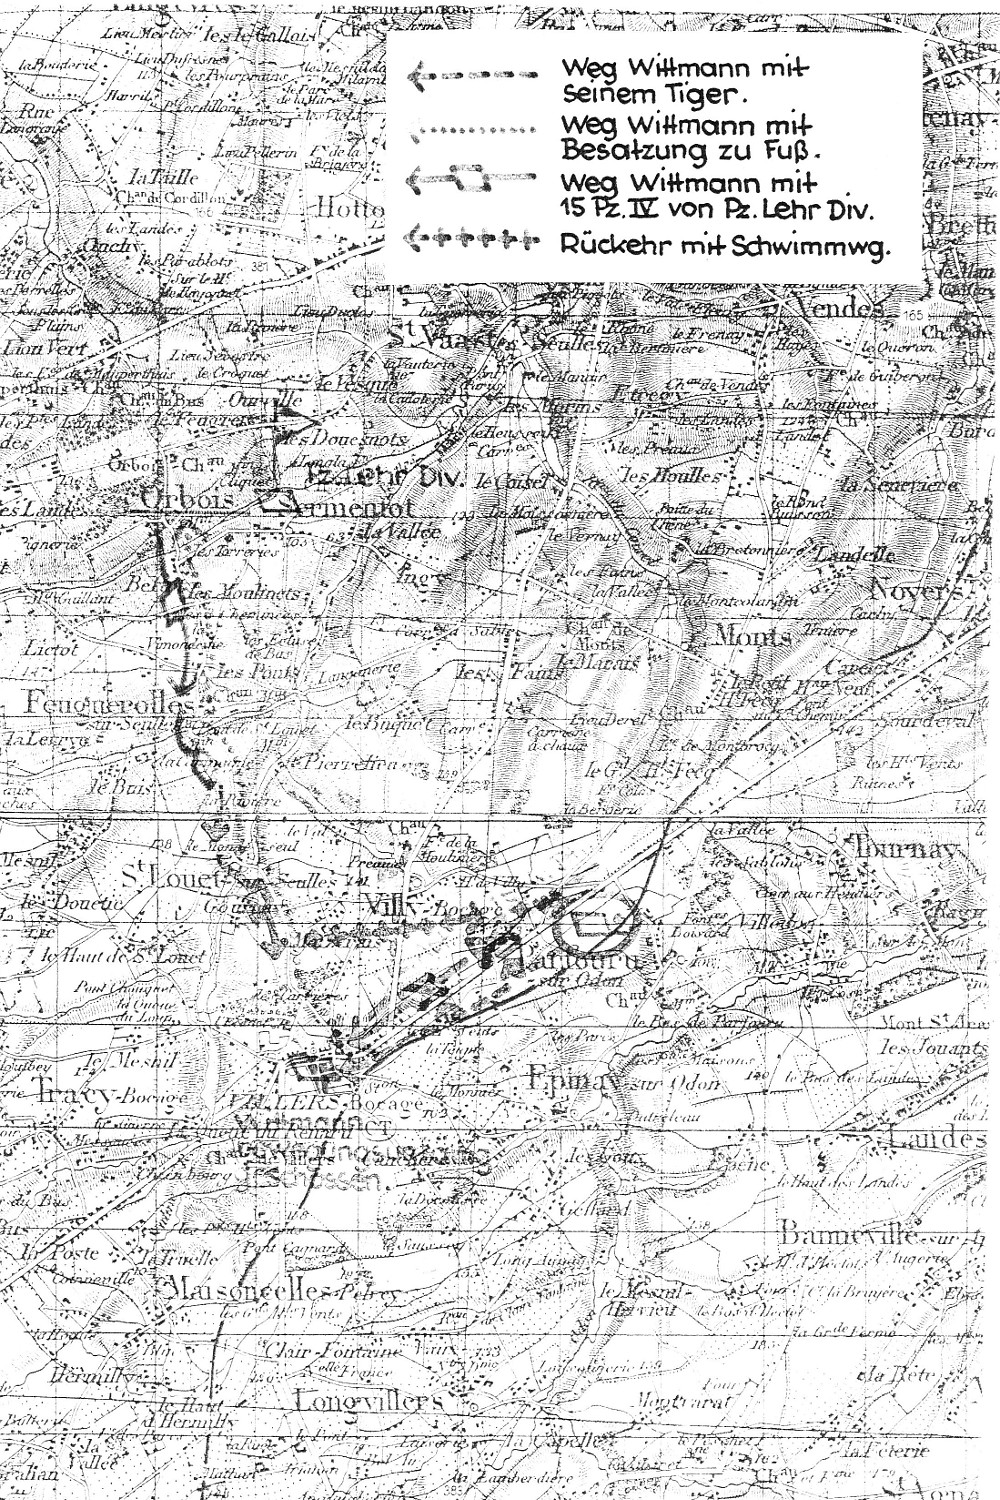
Having reached his destination, Wittmann provided his situation report of the morning’s events before returning to his unit later in the afternoon. The first part of his return route was with fifteen Panzer IVs of the Panzer-Lehr, taking him just south of Gournay en Bray where the convoy was subjected to enemy fire. He then completed his journey by Schwimmwagen, returning to a gathering point close to Hill 213 where he had started out in the morning. Wittmann’s activity on that day is covered in an annotated map found in the official files.
The second map is of the region today, with each route colour-coded. The Panzer-Lehr divisional shield emblem marks their location at Chateau d’Orbois.
 |
 |
Key for maps:
Weg Wittmann mit seinem Tiger – Route taken by Wittmann with his Tiger (GREEN 1, 2)
Weg Wittmann mit Besatzung zu Fuß – Route taken by Wittmann and his crew by foot (RED 3, 4)
Weg Wittmann mit 15 Pz. IV von Pz. Lehr Div. – Route taken by Wittmann with 15 Panzer IVs of the Panzer-Lehr Division (CYAN 5, 6)
Rück(k)ehr mit Schwimmwg. – Return with Schwimmwagen (YELLOW 7, 8)
Contrary to some reports that may have been circulated not long after the morning’s events, Michael Wittmann did not return to take part in the later attack on Villers Bocage. His task was to provide information to his colleagues.